Thursday 11 September 2014

Implement 2-Step Verification with Gmail & configure with Outlook

Two step verification is a security process in which user provides two identifications. Oneauthentication like card and token and anotheris for security code which is something memorized.

2 step verification helps to protect a user’s account from unauthorized access. It is an easier way for users to steal your password, if you are losing access to your account and important data or information in it.

For Gmail 2-step verification process

Prerequisites:
·        You have to log in using the Username & Password
·        You need to have a mobile phone that can receive the verification code via SMS or voice call.


Step 1:Create an account on Gmail and click the Accountbutton, you will land on the account setting page.


account


Step 2:Now select the Security tab and go to 2-step verification.


security-tab


Step 3:On the left menu bar you will see 2-step verification is Disable, click the Setupbutton.


setup


Step 4:Now open the new page in 2-step verification and select Start set up button.


start-set-up


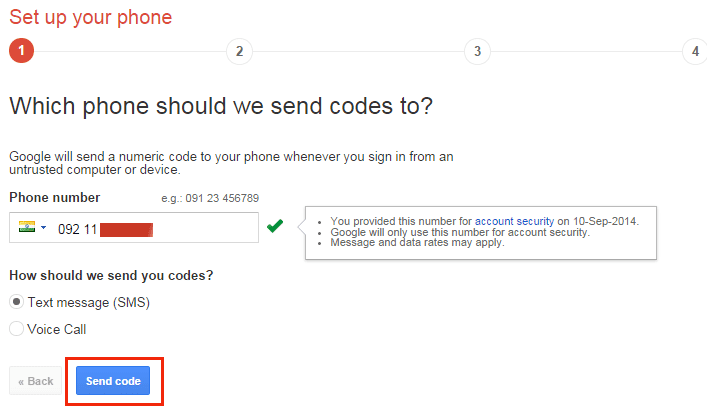
Step 5: Select whether you like to receive a Text message (SMS) or Voice call with your verification code and click Send code.


send-code


Step 6:Enter your Verification code which is given in 6 digits in your phone and click the Verify button.


phone-code


Step 7:After Verify code, a new window pop up and shows to you option for the Trust this computer.


trust-this-computer


Step 8:If you don't trust with the computer, remove the mark sign and then select the Don’t trust this computer option and click the Confirm button.


don't-trust-computer


confirm


Step 9: Now Select the box of Turn off and you will see the 2-step verification is Enable.


turn-off


enable-settings


After enabling this feature, 2-step verification of Gmail account, you need to configure with Outlook.

You can also the access App passwords page on the Security tab in your Gmail account and select the Settingsbar.


app-passwords-settings

app-password-done


Go to Outlook and paste or type the obtained app password when being prompted for your password. You can also go directly via your Account Settings.


Outlook 2007 >Tools >Account Settings… >Double click on your Gmail account


When your password is updated, Outlook will be able to connect to Gmail again with 2-step Verification enabled for your account.


Convert Outlook PST File to PDF File

Microsoft Outlook is the most renowned email client application. The Outlook is mostly used for storing, receiving, and sending email messages. PST is the file format for the data files that Outlook uses to store all the information. But in Outlook it’s difficult to share mailbox items outside Outlook environment. Mailbox data may be a loss if it is accessing and viewing outside email system environment. On the other hand PDF file format is independent from hardware and software. You can store and view PDF documents on most of the system platforms. PDF format also provides security option to prevent data from manipulation and unauthorized access.


Microsoft Outlook users want to convert PST file into PDF file format because it doesn't only contain text, email information, but also provide the facility to store graphic information without any destruction. PDF file format makes sharing and archiving, Microsoft Outlook data outside email environment reliable and efficient.

Outlook 2007, Outlook 2010, and even Outlook 2013 don’t have an inbuilt option to convert email messages as PDF files. But still there are several ways to achieve this.

Note: - User can convert Outlook email messages in PDF by using: -

  •      Free PST to PDF convertersoftware.

Like: - http://www.systoolsgroup.com/outlook-pst-to-pdf-converter.html

·        You can also download PDF converter option in Outlook by using this software.

    Like: - http://www.microsoft.com/en-us/download/confirmation.aspx?id=7

Step 1: - After download the software.
  •            Launch Microsoft Outlook 2007.


      Step 2: - In Outlook, select (or open) the email message.
  •             Want to convert to PDF format.


Step 3: - Now in next window-
  •  Select File tab and then click on Print.


      Step 4: - Now in next window select
  •  CutePDF Writerin the Printer section.


 Step 5: - In Print Style section you can choose between Table Style and Memo Style.
  •             You can also make your own print style by click on Define Style.


Step 6: - Before creating the PDF file

·            You can also change the page size, resolution, fonts, color, by click on                           Properties. 

Step 7: - Now click on OK.

Step 8: - Now in next pop-up window.
  •            Choose the locationwhere you want to save the PDF file.
  •            Click on Save.


According to above step you can easily convert your Outlook PST file into PDF file format.

Wednesday 10 September 2014

Adding RSS Feeds to Outlook from Internet Explorer

RSS (Rich Site Summary) is a format for delivering the regular web changing and updates. RSS Feeds are indicating the orange square button.


RSS Feeds enable publishers to syndicate data automatically. RSS Feeds are also known as Web Feeds. Many news-related sites, weblogs and other online publishers syndicate their content as an RSS Feed to whoever wants it. It is an easy way for people who are gathering the information about news, headlines, stories, weather and any information to you. The benefit of RSS is gathering all the content from multiple web sources in one place. A standard XML file format ensures compatibility with many different machines.

RSS feed, also known as Really Simple Syndication. RSS Feed is an internet address that tells with Outlook to find new information about a website.

Firstly, you need to get subscribed to the website then you can see RSS Feed content in Outlook. When you add an RSS to Outlook, you will get information delivered to your Outlook mailbox. 


This figure shows you RSS Feed in Microsoft Outlook 2007:


·        Learnt about how to add RSS Feeds in Outlook 2007


Step 1: Go to the Start menu, Open Microsoft Outlook and then click on the Outlook icon.


Step 2: Go to the Tool bar and click the Account Setting tab.


Step 3: Now choose RSS Feeds tab and then click New Folder.


Step 4: New RSS feed window pop up and you can copy the Link that you want, now click the Add button.


Step 5: After that RSS Feed Options window pop, you can write the name of Feed and select the location. Also, you can select the options of Downloads and Update Limit.


Step 6: Go down to your mail folders and select the RSS Feeds button.  Now you can easily browse your favorite web content in your RSS mail inbox. 


Note: You can also remove RSS Feed from Outlook by simply remove the folder or you can go to the RSS feed button> Tools>Account Settings... >Tab RSS Feeds> Remove.


After enabling this feature, you can automatically receive all information about the website in your Outlook mailbox.

Tuesday 9 September 2014

Create and Add an E-Mail Message Signature in Outlook 2007


Email signatures are used to display the sender’s information at the end of an email. An email signature is a small bit of information that contains the senders name, business contact information, email address and a website URL, etc. An email signature can be plain text or fancier with images and colors.

Below are instructions to create and add your own email signature in outlook 2007 email client: - 

Step 1: - Open up your Outlook 2007 email client by going to the start menu.


Step 2: - Open a New message and in message tab, click on the Signature and then click Signatures.
new signature


Step 3: - Now in the next window, choose an E-mail Signature tab, then click New.
new name

Step 4: - Now in next window when you click on the Newbutton, the New Signature Dialog Box will appear. Enter a new name for your signature and then click OK.

name of signature

Step 5: - In the Edit Signature box, enter the text you want for your new signature.

signature detail
Step 6: - Now in the next window you can change the format of text by using the Style and Formatting Buttons. You can also add Electronic Business Card and Picture by click on the icon.

change the format of signature


Step 7: - Click the OK button to save the new signature.
  save new signature 

Note: - From the above step you learn how to create a signature in Outlook and if you want to insert this signature in every email messages automatically then the procedure is shown below: -

 Step 1: - Open a new message in Outlook and in Message tab, click Signature and then click Signatures.

signature


Step 2: - Now in the next window under Choose Default Signature, in the E-mail Account option, select an email address from which you want to associate the signature.
select account

Step 3: - Now in the next window if you want to add a signature in message replies and in forwarded messages, then select the signature in New Messages and Replies/Forwards options and if not, select None, then click OK.
add signature in every mail
After enabling this feature, signature will automatically add in your every message reply and in forwarded messages.